
Why structure?
One of the most intimidating things about starting to do service and project based learning in the classroom is how to structure the time. One thing I have learned from direct experience in the classroom and from working with teachers is that this is structuring the time a key part of developing your plans and approach to project work.
A shift in culture
Many teachers come with an idea that you do all the teaching up front, then let students have their fairly unstructured project time, where you take a hands off approach and just “let them work on the project.” This is what we call a “dessert” approach– as in, the project is the dessert at the end of all the “real” learning.
One problem with this is that the approach makes the assumption that students are independent and filled with self-direction and motivation– they have all the skills they need to dive in. The reality is often that students have become very used to teachers telling them what to do, when to do it, and how to do it. This personalized approach is so very different that if often takes a lot of support to help students transition to it and to build the stamina and culture necessary for the deeper, rigorous, engaging and challenging learning that these environments call for.
Project Block Structures
In an effort to bridge that gap, I wanted to offer some structures for project time that might be helpful in your classrooms as you plan and led a dynamic project based or service learning environment with students.
60 minute block plan:
| Review the Essential Question and/or Learning Targets: Start with some grounding in the essential question and/or the learning targets. Read and discuss the question quickly, rooting everyone in the grander purpose of the work. (3 minutes) |
| Resources and phases of learning: Show what phase most groups are in and any essential tools for this project periods. This could be the research phase, and could include some teaching about tools to use or a small group schedule for direct instruction during this time. The teacher can refer students to a timeline or other graphic organizer for the project (3 minutes). |
| How to get help: Review a process for if a group or individual needs help: Where are the resources? Do students write their names on the board if they want to check in with a teacher, or will the teacher have a schedule for visiting each group? (2 minutes) |
| Norms/expectations: Ask a student to describe what the work time should look like and sound like, or quickly review your class norms and procedures for productive learning time. (2 minutes) |
| Project work time: Rotate to each group, asking questions, providing resources, keeping notes, teaching direct instruction in small groups as needed or planned. (40 minutes) |
| Reflection/Evidence Gathering/Goal Setting for Continued Work: Ask students to stop and take the next 10 minutes to record their thinking (possibly from a reflection menu) on a platform of choice or other procedure for PLPs and reflections for the project. This could be using Flipgrid, sketchnotes, and reflection questions to probe what is going well, what are the challenges, and what are your next steps? (10 minutes) |
45 minute block
| Start with Sharing: Where is your group on the project? What do you need? How can our learning community help you? (10 minutes) |
| Resources and Focus: Teacher shares new resources, information, and/or a guiding focus or learning target of the day. (2 minutes) |
| Project Work Time/Teacher Rotation: Rotate to each group, asking questions, providing resources, keeping notes, teaching direct instruction in small groups as needed or planned. (20 minutes) |
| Formative Assessment and Reflection: As a whole group or individuals, ask students to respond to a prompt about their learning and process today. Dig for deeper understanding and uncovering misunderstandings for tomorrow’s lessons and project time. Add these if possible to a PLP or portfolio of student learning in project time. (13 minutes). |
Tools to help build structure and organize project time
Use digital tool to organize the time:
Create a padlet or slideshow for each project time with the essential question; needed resources; schedules for check ins; curated research links; and other tools to support the work and share the link with your students.
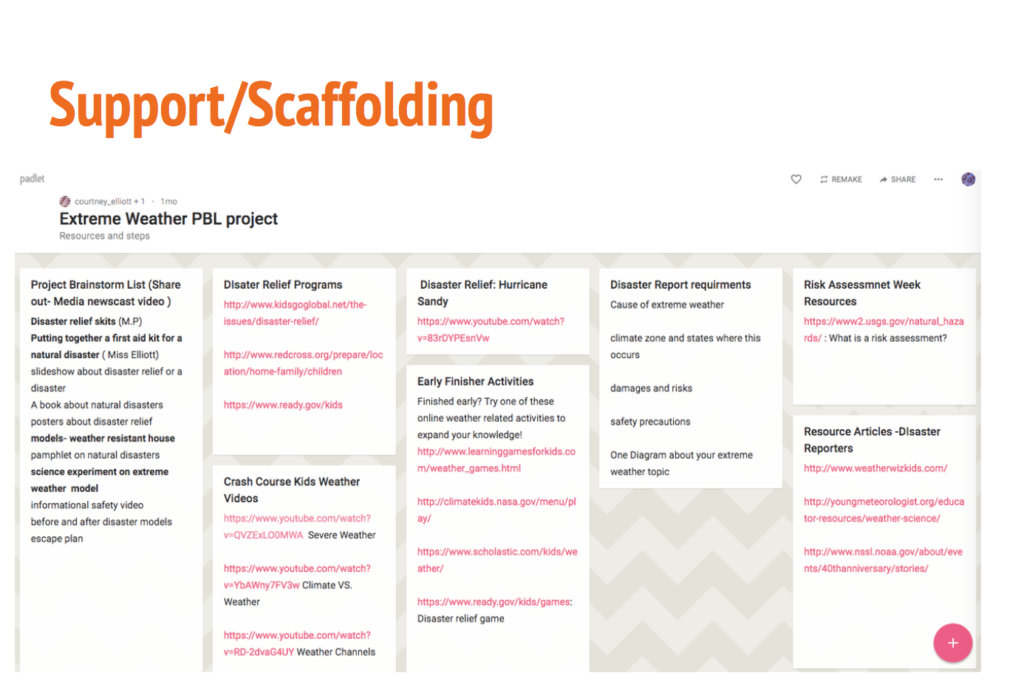
Like Courtney Elliot does here on her project padlet.
Use public timers: Project a countdown clock for each section of time during the project block so students understand how much time they have and feel a sense of urgency.
Reflection/Evidence Gathering/Goal Setting for Continued Work: Ask students to stop and take the next 10 minutes to record their thinking (possibly from a reflection menu) on a platform of choice or other procedure for PLPs and reflections for the project.
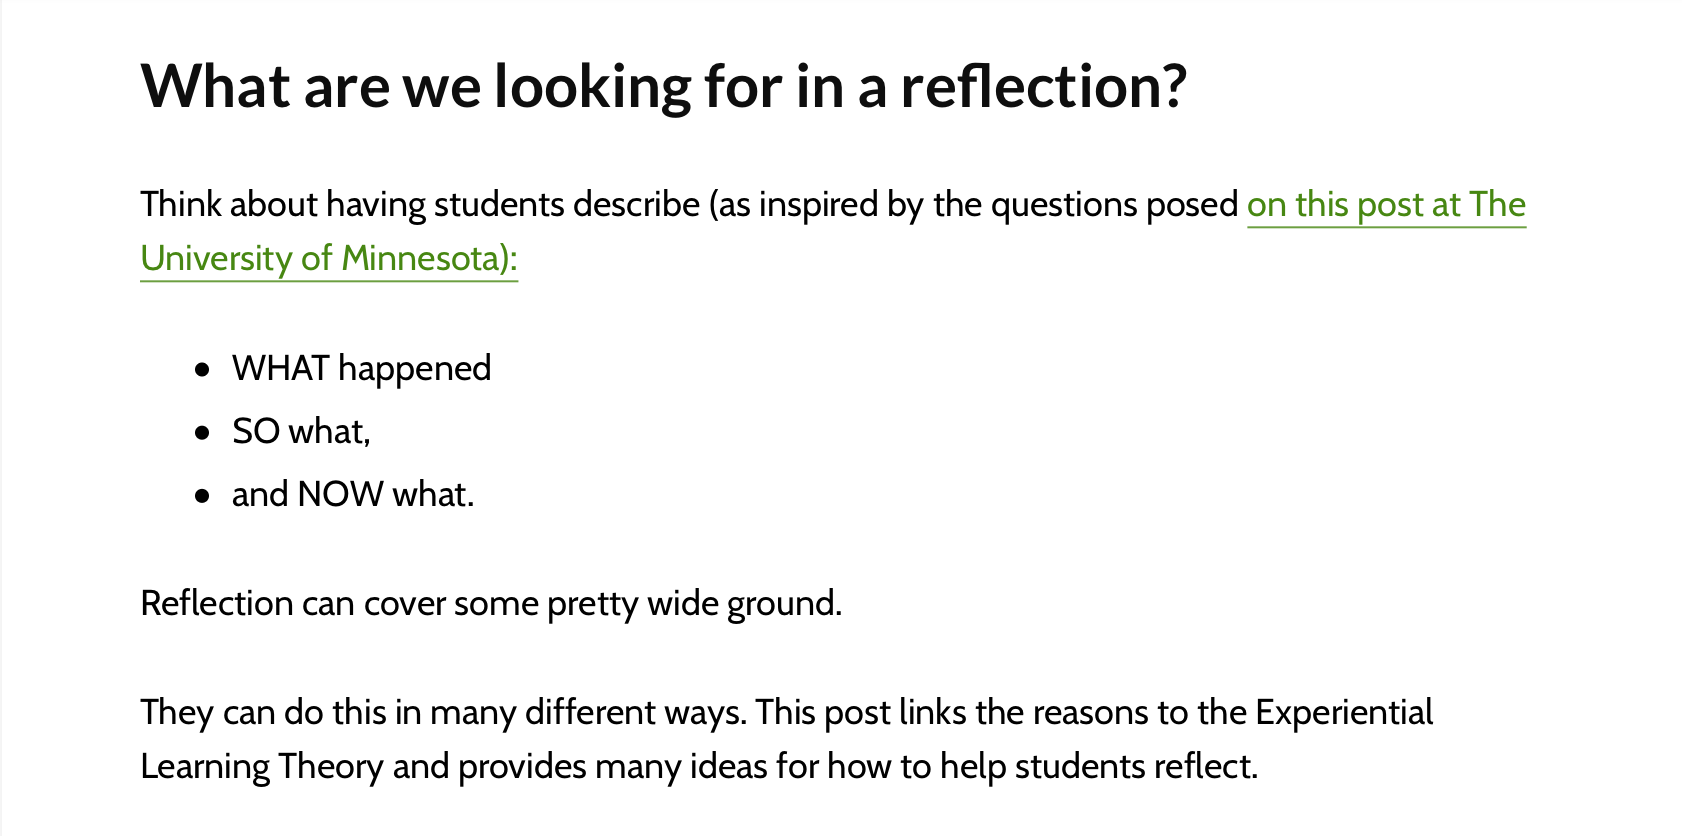
This could be using Flipgrid, sketchnotes, and reflection questions to probe what is going well, what are the challenges, and what are your next steps? (10 minutes). In this tool you can create your project based learning experience on tiles that can be linked to resources, such as google docs, websites, or images.
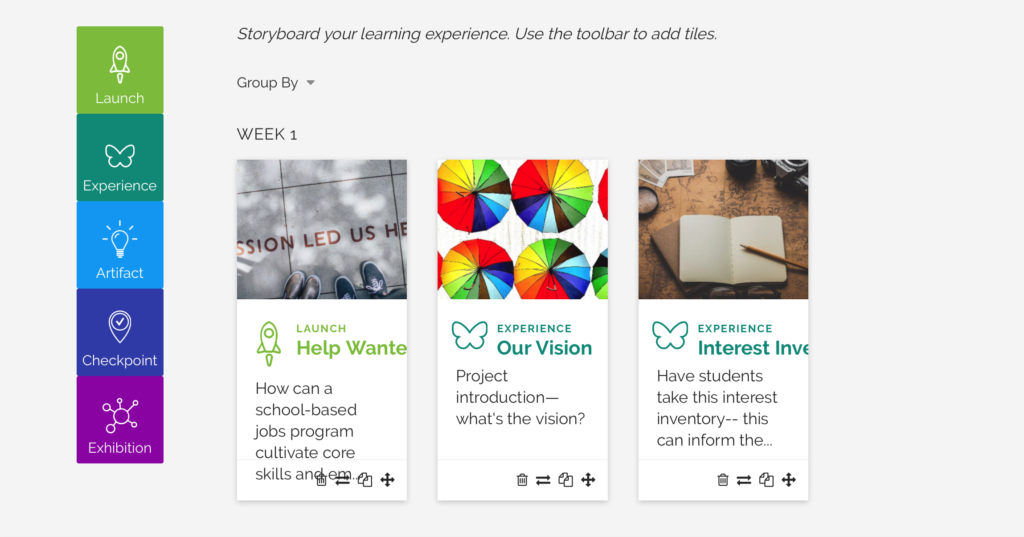
By projecting a tile, the teacher can discuss what the learning artifact is for that time period, or what phase the project is in, and guide students with this tool. See this example. Students can also use this tool to organize their own learning time.
Practitioners of the personalized learning strategies of project and service learning often find the right structures to support their learners through experience– and it is always changing as are our students. If we create intentional supports for project time, while allowing for student voice, choice and creativity, we can support students in being purposeful and self-directed during this time.